
CLW2-32 modular cam switches have a conventional thermal-current rating of 32A. Their rotary contact programs cover on/off switching, changeover, instrument selection and motor-control applications. Conventional, label, illuminated, G2-handle and panel-key arrangements provide distinct operating and mounting choices.
Choose the position program, contact schedule, section count, handle and panel print together. Standard detent versions support up to nine sections; spring-return and illuminated versions support up to eight. Eight or fewer sections are generally recommended, with six or fewer recommended for the illuminated D version. Standard indexing steps are 45°, 60° and 90°.
| Field | Code / selection | Meaning |
|---|---|---|
| Design family | CLW2 | Modular cam switch |
| Thermal current | 32 | Ith32A |
| Mechanical function | Omitted | Conventional version |
| D | Illuminated version | |
| P | Label version, default label arrangement | |
| G2 | G2 handle arrangement | |
| Y2 | Panel-mounted key below the operating handle | |
| Y2P | Panel-mounted key and label arrangement | |
| Position program | Example: 6KC | Indexing step and starting/ending positions; this example gives −60°, 0°, 60° |
| Contact program | Example: 202 | Contact states at each position; special programs require a defined diagram |
| Sections | 1–9; illustrated example: 3 | Detent≤9; return/illuminated≤8; generally preferably≤8; D preferably≤6 |
| Handle | AD / G2 | Select the handle for the mounting version |
| Handle color | K / C / R | Black / blue / red |
| Panel print | Example: B14; special print: P | Omission retains standard printing associated with the contact program |


The first position-code character is 4 for 45°, 6 for 60° or 9 for 90°. The next two letters identify starting and ending positions clockwise on the matching circle. A is the 0° reference; O is a position letter. For unrestricted 360° rotation, the ending letter repeats the starting letter: 45° gives eight positions, 60° gives six and 90° gives four. Contact logic and section count can restrict available travel.
| Code | Indexing step | Position sequence |
|---|---|---|
| 4OB | 45° | O, A, B |
| 6KE | 60° | K, A, C, E |
| 9GC | 90° | G, A, C |

Arrows indicate spring-return direction. Commas separate positions without a return arrow between them. All 27 programs below are listed as available.
| Return code | Angles and return directions |
|---|---|
| A2 | 0° ← 45° |
| A3 | −45° ← 45° |
| A4 | −45° ← 0° |
| A5 | 0° ← 90° |
| B2 | −45° → 0° ← 45° |
| B4 | −90°, −45°, 0°, 45° ← 90° |
| B5 | −90°, −45°, 0° ← 45° |
| B7 | −90° → −45°, 0°, 45°, 90°, 135° |
| B8 | −90° → −45°, 0°, 45°, 90° |
| B9 | −45° → 0°, 45°, 90°, 135° |
| B10 | −45° → 0°, 45°, 90°, 135°, 180° |
| B11 | −45° → 0° ← 45° ← 90° |
| BA | −90° → −45° → 0° ← 45° ← 90° |
| BA1 | −45° → 0° → 45° ← 90° ← 135° |
| BC | −45° → 0° ← 45° |
| D4 | 0° ← 45° ← 90° |
| Z1 | −135° → −90°, 0° ← 45° |
| Z2 | −45° → 0°, 90° ← 135° |
| ZA | −90° → −45°, 0°, 45° ← 90° |
| ZB | −90° → −45°, 0°, 45° |
| ZC | −45°, 0°, 45° ← 90° |
| ZD | −90°, 0° ← 45° |
| ZE | 0°, 45° ← 90° |
| ZF | −45°, 0° ← 45° |
| ZG | −45° → 0°, 45° |
| ZK | −45° → 0°, 45°, 90° |
| ZK1 | −45° → 0°, 45°, 90°, 135° |
| Group | Parameter | Value |
|---|---|---|
| Electrical and mechanical | Referenced standard | GB/T14048.5 |
| Conventional thermal current | 32A | |
| Rated insulation voltage | 690VAC | |
| Impulse withstand voltage | 4kV | |
| Frequency | 50Hz technical rating; 50/60Hz application range | |
| Mechanical life | 500000 operations | |
| Electrical life | AC300000; DC200000 operations | |
| Operating frequency | 300 operations/hour | |
| Shock resistance | 50g, 11ms, half-sine waveform | |
| Vibration resistance | 10–500Hz, 5g | |
| Operating conditions | Ambient temperature | −25°C to +55°C |
| Humidity | ≤90%RH | |
| Pollution degree | 3 | |
| Installation category | III | |
| Storage/transport temperature | −40°C to +80°C | |
| Protection | IP65 at the working face |
Application voltage limits are 380VAC and 220VDC. Select the operating current for the utilization category; Ith32A is the thermal-current value.
| Utilization category | 24V | 48V | 110V | 220V | 380V |
|---|---|---|---|---|---|
| AC-15 | — | — | — | 12A | 6A |
| DC-13 | — | — | 1.5A | 0.5A | — |
A dash denotes an unspecified rating.
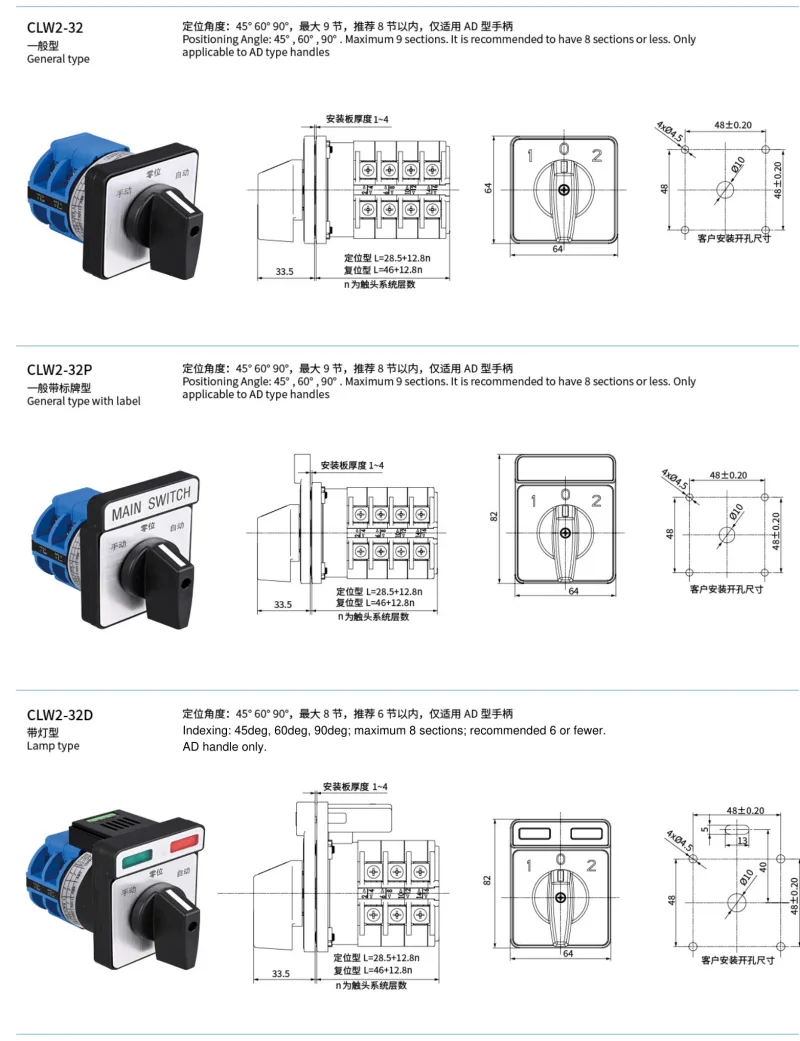
Dimensions below are in mm; n is the number of contact sections. The contact-block pitch is 12.8mm. All illustrated versions use 1–4mm panels, four Ø4.5 fixing holes on a 48±0.20 square and a central Ø10 opening.
| Version | Handle / plate dimensions | Front projection | Rear depth | Additional opening |
|---|---|---|---|---|
| CLW2-32 | AD; 64×64 | 33.5 | Detent28.5+12.8n; return46+12.8n | None illustrated |
| CLW2-32P | AD; 64×82 label plate | |||
| CLW2-32D | AD; 64×82 illuminated plate | 13×5 lamp slot; center40 above handle center | ||
| CLW2-32G2 | G2; 64×64 | 43 | None illustrated | |
| CLW2-32Y2 | AD and panel key; 64×105.75 | Not specified | Detent47+12.8n; return64.5+12.8n | Ø34 key opening; center48±0.20 below handle center |
| CLW2-32Y2P | AD, panel key and label; 64×122.75 |

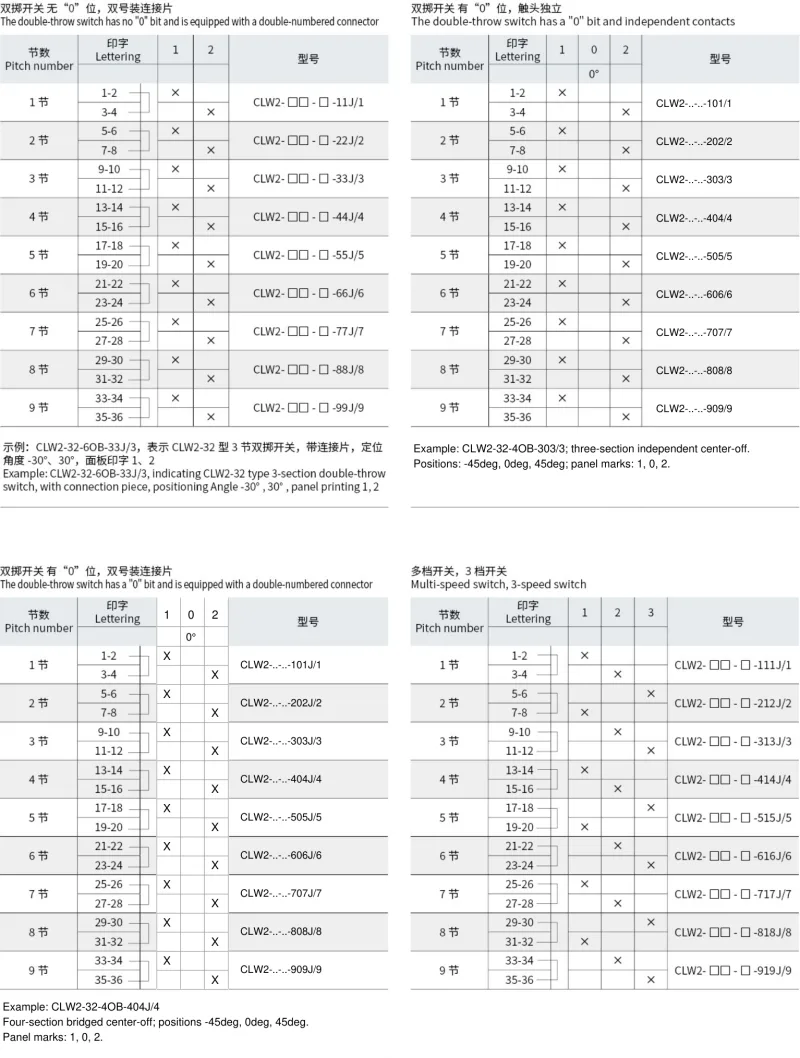
Each section adds the two terminal pairs shown below. For a chosen section count, include every row from section 1 through that count. On/off programs open all contacts at 0 and close both pair groups at 1. Changeover closes the first group at position 1 and the second at position 2; center-off adds an all-open position 0 between them.
| Sections | On/off | Independent two-position | Bridged two-position | Independent center-off | Bridged center-off | Added first-group pair | Added second-group pair |
|---|---|---|---|---|---|---|---|
| 1 | 02/1 | 11/1 | 11J/1 | 101/1 | 101J/1 | 1–2 | 3–4 |
| 2 | 04/2 | 22/2 | 22J/2 | 202/2 | 202J/2 | 5–6 | 7–8 |
| 3 | 06/3 | 33/3 | 33J/3 | 303/3 | 303J/3 | 9–10 | 11–12 |
| 4 | 08/4 | 44/4 | 44J/4 | 404/4 | 404J/4 | 13–14 | 15–16 |
| 5 | 0A/5 | 55/5 | 55J/5 | 505/5 | 505J/5 | 17–18 | 19–20 |
| 6 | 0C/6 | 66/6 | 66J/6 | 606/6 | 606J/6 | 21–22 | 23–24 |
| 7 | 0E/7 | 77/7 | 77J/7 | 707/7 | 707J/7 | 25–26 | 27–28 |
| 8 | 0G/8 | 88/8 | 88J/8 | 808/8 | 808J/8 | 29–30 | 31–32 |
| 9 | 0I/9 | 99/9 | 99J/9 | 909/9 | 909J/9 | 33–34 | 35–36 |
Bridged programs add even-terminal links 2–4, 6–8, 10–12 and the corresponding even-terminal pair on each subsequent section.
| Complete example | Function | Angles | Panel marks |
|---|---|---|---|
| CLW2-32-4AB-06/3 | Three-section on/off | 0°, 45° | 0, 1 |
| CLW2-32-9OB-33/3 | Three-section independent changeover | −45°, 45° | 1, 2 |
| CLW2-32-6OB-33J/3 | Three-section bridged changeover | −30°, 30° | 1, 2 |
| CLW2-32-4OB-303/3 | Three-section independent center-off | −45°, 0°, 45° | 1, 0, 2 |
| CLW2-32-4OB-404J/4 | Four-section bridged center-off | −45°, 0°, 45° | 1, 0, 2 |

For each program, use only terminal pairs within the stated range. Each fitted pair closes at the position in the contact map and stays open at other positions. Keep the links in the corresponding wiring diagram. The ten-section references exceed the standard nine-section detent limit. Their illustrated schedules cover only pairs 1–2 through 35–36 and do not specify additional contacts.
| Positions | Program | Sections | Illustrated terminal-pair range |
|---|---|---|---|
| 3 | 111J/1 | 1 | 1–2 through 3–4 |
| 212J/2 | 2 | 1–2 through 7–8 | |
| 313J/3 | 3 | 1–2 through 11–12 | |
| 414J/4 | 4 | 1–2 through 15–16 | |
| 515J/5 | 5 | 1–2 through 19–20 | |
| 616J/6 | 6 | 1–2 through 23–24 | |
| 717J/7 | 7 | 1–2 through 27–28 | |
| 818J/8 | 8 | 1–2 through 31–32 | |
| 919J/9 | 9 | 1–2 through 35–36 | |
| 4 | 1111J/2 | 2 | 1–2 through 7–8 |
| 2222J/4 | 4 | 1–2 through 15–16 | |
| 3333J/6 | 6 | 1–2 through 23–24 | |
| 4444J/8 | 8 | 1–2 through 31–32 | |
| 5555J/10 | 10, reference only | Shown only through 35–36 | |
| 5 | 1x5J/3 | 3 | 1–2 through 11–12 |
| 2x5J/5 | 5 | 1–2 through 19–20 | |
| 3x5J/8 | 8 | 1–2 through 31–32 | |
| 4x5J/10 | 10, reference only | Shown only through 35–36 |
| Terminal pair | 3-position: closed position | 4-position: closed position | 5-position: closed position |
|---|---|---|---|
| 1–2 | 1 | 1 | 1 |
| 3–4 | 2 | 2 | 5 |
| 5–6 | 3 | 3 | 2 |
| 7–8 | 1 | 4 | 3 |
| 9–10 | 2 | 1 | 4 |
| 11–12 | 3 | 2 | 2 |
| 13–14 | 1 | 3 | 3 |
| 15–16 | 2 | 4 | 4 |
| 17–18 | 3 | 1 | 1 |
| 19–20 | 1 | 2 | 5 |
| 21–22 | 2 | 3 | 1 |
| 23–24 | 3 | 4 | 5 |
| 25–26 | 1 | 1 | 2 |
| 27–28 | 2 | 2 | 3 |
| 29–30 | 3 | 3 | 4 |
| 31–32 | 1 | 4 | 2 |
| 33–34 | 2 | 1 | 3 |
| 35–36 | 3 | 2 | 4 |

A special × suffix requires a separate contact diagram; it does not specify a unique switching pattern by itself.
| Program | Position 1 closed pairs | Position 2 closed pairs | Position 3 closed pairs |
|---|---|---|---|
| 424/3 | 1–2, 3–4, 5–6, 7–8 | 9–10, 11–12 | 1–2, 3–4, 5–6, 7–8 |
| 424×/3, illustrated custom schedule | 1–2, 7–8, 11–12 | 5–6, 11–12 | 1–2, 3–4, 5–6, 7–8, 9–10 |
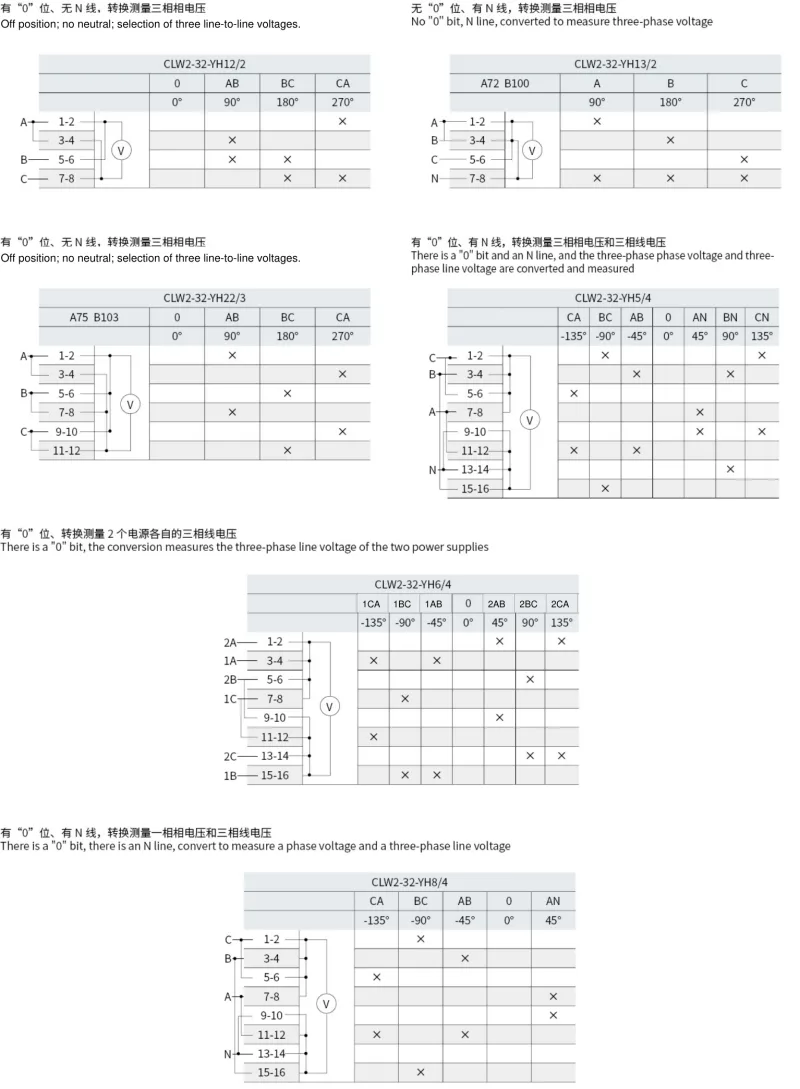
The schedules below list closed pairs at each panel position. All unlisted pairs are open. Retain the internal and external links shown in the matching circuit.
| Model | Measurement arrangement | Position, angle → closed pairs |
|---|---|---|
| CLW2-32-YH1/3 | Three phase-to-neutral voltages; N connection and off position |
0, 0° → None
A, 90° → 1–2, 9–10 B, 180° → 5–6, 9–10 C, 270° → 3–4, 9–10 |
| CLW2-32-YH2/3 | Three line voltages; off position |
0, 0° → None
AB, 90° → 1–2, 7–8 BC, 180° → 1–2, 11–12 CA, 270° → 5–6, 11–12 |
| CLW2-32-YH3/3 | Three line voltages; no N; off position |
0, 0° → None
AB, 90° → 1–2, 7–8 BC, 180° → 5–6, 11–12 CA, 270° → 3–4, 9–10 |
| CLW2-32-YH4/2 | Three line voltages; no off position; A/B/C panel marks |
A, −90° → 1–2, 7–8
B, 0° → 1–2, 3–4 C, 90° → 3–4, 5–6 |
| CLW2-32-YH12/2 | Three line voltages; no N; off position |
0, 0° → None
AB, 90° → 3–4, 5–6 BC, 180° → 5–6, 7–8 CA, 270° → 1–2, 7–8 |
| CLW2-32-YH13/2 | Three phase-to-neutral voltages; N connection; no off position; panel references A72/B100 |
A, 90° → 1–2, 7–8
B, 180° → 3–4, 7–8 C, 270° → 5–6, 7–8 |
| CLW2-32-YH22/3 | Three line voltages; no N; off position; panel references A75/B103 |
0, 0° → None
AB, 90° → 1–2, 7–8 BC, 180° → 5–6, 11–12 CA, 270° → 3–4, 9–10 |
| CLW2-32-YH5/4 | Three line and three phase-to-neutral voltages; N connection and off position |
CA, −135° → 5–6, 11–12
BC, −90° → 1–2, 15–16 AB, −45° → 3–4, 11–12 0, 0° → None AN, 45° → 7–8, 9–10 BN, 90° → 3–4, 13–14 CN, 135° → 1–2, 9–10 |
| CLW2-32-YH6/4 | Three line voltages from each of two supplies; off position |
Supply 1 CA, −135° → 3–4, 11–12
Supply 1 BC, −90° → 7–8, 15–16 Supply 1 AB, −45° → 3–4, 15–16 0, 0° → None Supply 2 AB, 45° → 1–2, 9–10 Supply 2 BC, 90° → 5–6, 13–14 Supply 2 CA, 135° → 1–2, 13–14 |
| CLW2-32-YH8/4 | Three line voltages and one phase-to-neutral voltage; N connection and off position |
CA, −135° → 5–6, 11–12
BC, −90° → 1–2, 15–16 AB, −45° → 3–4, 11–12 0, 0° → None AN, 45° → 7–8, 9–10 |

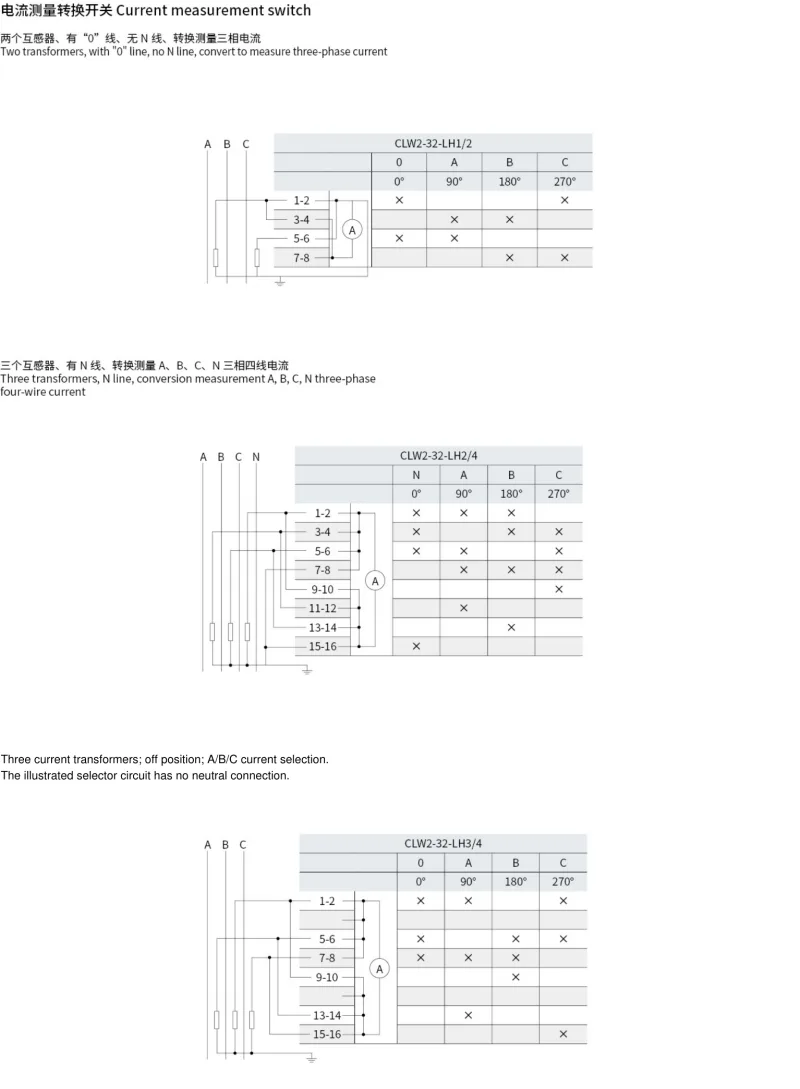
Keep the current-transformer wiring and shorting contacts for the chosen program. A position marked 0 can retain closed CT shorting contacts.
| Model | Arrangement | Position, angle → closed pairs |
|---|---|---|
| CLW2-32-LH1/2 | Two CTs; no N; 0/A/B/C selection |
0, 0° → 1–2, 5–6
A, 90° → 3–4, 5–6 B, 180° → 3–4, 7–8 C, 270° → 1–2, 7–8 |
| CLW2-32-LH2/4 | Three CTs and N; N/A/B/C selection |
N, 0° → 1–2, 3–4, 5–6, 15–16
A, 90° → 1–2, 5–6, 7–8, 11–12 B, 180° → 1–2, 3–4, 7–8, 13–14 C, 270° → 3–4, 5–6, 7–8, 9–10 |
| CLW2-32-LH3/4 | Three CTs; no N; 0/A/B/C selection |
0, 0° → 1–2, 5–6, 7–8
A, 90° → 1–2, 7–8, 13–14 B, 180° → 5–6, 7–8, 9–10 C, 270° → 1–2, 5–6, 15–16 |
| Use code | Application |
|---|---|
| Q | Direct starting of a squirrel-cage motor |
| N | Forward/reverse starting |
| S | Two-speed motor starting and speed selection |
| XS | Star/delta starting |
Motor-use ordering fields include thermal current, use code and motor power in kW, followed by the program's section and option fields. In these examples, 3 denotes 3kW and 1.2 denotes 1.2kW.
| Model | Application | Position, angle → closed pairs |
|---|---|---|
| CLW2-32-Q3/2 | Direct starting; switching off during operation |
OFF, 0° → None
ON, 45° → 1–2, 3–4, 5–6 |
| CLW2-32-N1.2/3 | Starting, reversing and reverse-current braking |
1, −45° → 3–4, 5–6, 9–10, 11–12
0, 0° → None 2, 45° → 1–2, 7–8, 9–10, 11–12 |
| CLW2-32-S3/4 | Two-speed motor starting and speed selection |
1, −45° → 1–2, 5–6, 7–8, 11–12, 13–14
0, 0° → None 2, 45° → 1–2, 3–4, 5–6, 9–10, 13–14, 15–16 |

Print codes identify wording and physical layout. The English equivalents below preserve the label meanings; drawings show their positions and return arrows. Special printing uses P; omission retains the contact program's standard printing. The 30° and 22.5° layouts are print references and do not establish those indexing steps for a standard CLW2-32 mechanism.
| Code group | Layout angle | Content |
|---|---|---|
| A1–A22 | 30° reference | Worded operating and metering plates |
| B1–B59 | 45° | Worded operating, distribution and metering plates |
| C1–C18 | 60° | Worded operating plates |
| D1–D22 | 90° | Worded operating and metering plates |
| E1–E8 | 22.5° reference | Numeric and Auto/Stop/Manual plates |
| F1–F17 | 30° reference | Numeric plates |
| G1–G29 | 45° | Numeric plates |
| H1–H14 | 60° | Numeric plates |
| I1–I11 | 90° | Numeric plates |
| Print code | English wording / symbols |
|---|---|
| A1 / B1 | Raise / 0 / Lower |
| A2 / B2 | Start / 0 / Stop |
| A3 / B3 | Trip / Stop / Close |
| A4 / B4 | Trip / 0 / Close |
| A5 / B5 | Off / 0 / On |
| A6 / B6 | Remote / Stop / Local |
| A7 / B7 | Increase speed / 0 / Decrease speed |
| A8 / B8 | Trip / Disconnect / Close |
| A9 / B9 | Open / 0 / Close |
| A10 / B10 | Close / 0 / Trip |
| A11 / B11 | Trip / 0 / Close |
| A12 | OFF / ON |
| A13 | Trip / 0 / Close |
| A14 | Auto / 0 / Manual |
| A15 | Raise voltage / Stop / Lower voltage |
| A16 | On / Stop / Off |
| A17 | Close / 0 / Trip |
| A18 | Decrease speed / Stop / Increase speed |
| A19 | AB, BC, CA, 0, A, B, C |
| A20 | Auto / Stop / Manual / 2–6 |
| A21 | Auto / Stop / Manual / 2–8 |
| A22 | Auto / Stop / Manual / 2–10 |
| B12 | Remote / Local / Trip / Close, arranged as illustrated |
| B13 | Remote / After trip / After close / Trip / Close |
| B14 / B15 / B16 | Pre-close / After close / Close / Pre-trip / After trip / Trip; three illustrated layouts |
| B17 | Stop / Start |
| B18 | On / Off |
| B19 | Manual / Auto |
| B20 | Insert / Withdraw |
| B21 | Working / Test |
| B22 | Disconnect / Connect |
| B23 | Local / Remote |
| B24 | Switch cabinet / Operator station |
| B25 | Withdraw / Insert |
| B26 | Manual / Auto |
| B27 | Remote / Local |
| B28 | Disconnect / Connect |
| B29 | Auto / Standby |
| B30 | Stop / Start |
| B31 | Field / Remote |
| B32 | Remote / Field |
| B33 | Manual / Remote control |
| B34 | Withdraw / Insert |
| B35 | Interlock / Manual |
| B36 | On / Off |
| B37 | Test / Run |
| B38 | Disconnect / Remote |
| B39 | 1 / 2 / 3 / OFF |
| B40 | Trip / 0 / Close |
| B41 | Auto / Stop / Manual |
| B42 | Trip / 0 / Close |
| B43 | Run / Stop / Test |
| B44 | Increase excitation / Stop / Decrease excitation |
| B45 | Manual / Disconnect / Auto |
| B46 | Decrease speed / Disconnect / Increase speed |
| B47 | Raise voltage / Stop / Lower voltage |
| B48 | Local / Stop / Remote |
| B49 | Manual / Stop / Auto |
| B50 | Parallel / 0 / Separate |
| B51 | Local / 0 / Remote |
| B52 | Local / Disconnect / Remote |
| B53 | Decrease / 0 / Increase |
| B54 | Low voltage / High voltage |
| B55 | Local / 0 / Remote control |
| B56 | Parallel / 0 / Separate |
| B57 | Working / Stop / Standby |
| B58 | 0 and two sets of UAB / UBC / UCA |
| B59 | 0, UAB / UBC / UCA and UA / UB / UC |
| C1 | Manual / Auto |
| C2 | Remote / Local |
| C3 | Local / Remote |
| C4 | Trip / Close |
| C5 | Off / On |
| C6 | Auto / Manual |
| C7 | Manual / Auto |
| C8 | Parallel / Release |
| C9 | Auto / Manual |
| C10 | Local / Remote |
| C11 | Remote / Local |
| C12 | Trip / Disconnect / Close |
| C13 | Decrease speed / Disconnect / Increase speed |
| C14 | Manual / Stop / Auto |
| C15 | Auto / Stop / Manual |
| C16 | Local / Release / Remote |
| C17 | Manual / Reset / Auto |
| C18 | Remote / Local |
| D1 | Manual / Auto |
| D2 | Local / Remote |
| D3 | Auto / Manual |
| D4 | Remote / Local |
| D5 | Trip / Close |
| D6 | On / Off |
| D7 | Field / Remote |
| D8 | Close / Trip |
| D9 | Release / Parallel |
| D10 | Test / Run |
| D11 | Disabled / Enabled |
| D12 | Trip / Close |
| D13 | Field / Remote |
| D14 | Withdraw / Insert |
| D15 | Interlock / Release |
| D16 | IA / IB / IC |
| D17 | UAB / UBC / UCA |
| D18 | UA / UB / UC |
| D19 | 0, UA / UB / UC |
| D20 | 0, UAB / UBC / UCA |
| D21 | 0, IA / IB / IC |
| D22 | 0, IAB / IBC / ICA |
| E1 | 0–12 |
| E2 | 0–13 |
| E3 | Auto / Stop / Manual / 2–11 |
| E4 | Auto / Stop / Manual / 2–12 |
| E5 | Auto / Stop / Manual / 2–13 |
| E6 | Auto / Stop / Manual / 2–14 |
| E7 | 0–15 |
| E8 | 0–16 |


| Numeric print code | Printed numbers / return marks |
|---|---|
| F1 / G1 | 0 ← 1 |
| F2 / G2 | 1 ← 2 |
| F3 / G3 | 1 → 0 ← 2 |
| F4 / G4 | 1 → 2 ← 3 |
| F5 | 0, 1 |
| F6 | 1, 2 |
| F7 | 0, 1, 2 |
| F8 | 1, 0, 2 |
| F9 | 1, 2, 3 |
| F10 | 2, 1, 0, 1, 2 |
| F11 | 1–5 |
| F12 | 0–4 |
| F13 | 0–5 |
| F14 | 3, 2, 1, 0, 1, 2, 3 |
| F15 | 0–7 |
| F16 | 0–8 |
| F17 | 0–11 |
| G5 / G6 | 0, 1; distinct layouts |
| G7 | 1, 0 |
| G8 / G9 | 1, 2; distinct layouts |
| G10 | 0, 1, 2 |
| G11 | 1, 0, 2 |
| G12 / G13 | 1, 2, 3; distinct layouts |
| G14 | 1, 0, 1, 2 |
| G15 / G16 | 1–4; distinct layouts |
| G17 | 0–4 |
| G18 | 2, 1, 0, 1, 2 |
| G19 / G20 | 1–5; distinct layouts |
| G21 | 0–5 |
| G22 | 1–6 |
| G23 | 2, 1, 0, 1, 2, 3 |
| G24 | 0–6 |
| G25 | 1–7 |
| G26 | 0–7 |
| G27 | 1–8 |
| G28 | 0–7, circular layout |
| G29 | 1–8, circular layout |
| H1 | 0, 1 |
| H2 / H3 / H4 | 1, 2; distinct layouts |
| H5 | 0, 1 |
| H6 | 1, 0, 2 |
| H7 | 1, 2, 3 |
| H8 | 0, 1, 2 |
| H9 | 0–3 |
| H10 | 1–4 |
| H11 | 1–5 |
| H12 | 2, 1, 0, 1, 2 |
| H13 | 1–6 |
| H14 | 0–5 |
| I1 | 0, 1 |
| I2 | 1, 2 |
| I3 | 0, 1 |
| I4 | 1, 2 |
| I5 | 1, 2 |
| I6 | 0, 1, 2 |
| I7 | 1, 0, 2 |
| I8 | 1, 2, 3 |
| I9 | 0–3 |
| I10 | 1–4 |
| I11 | 0–3 |

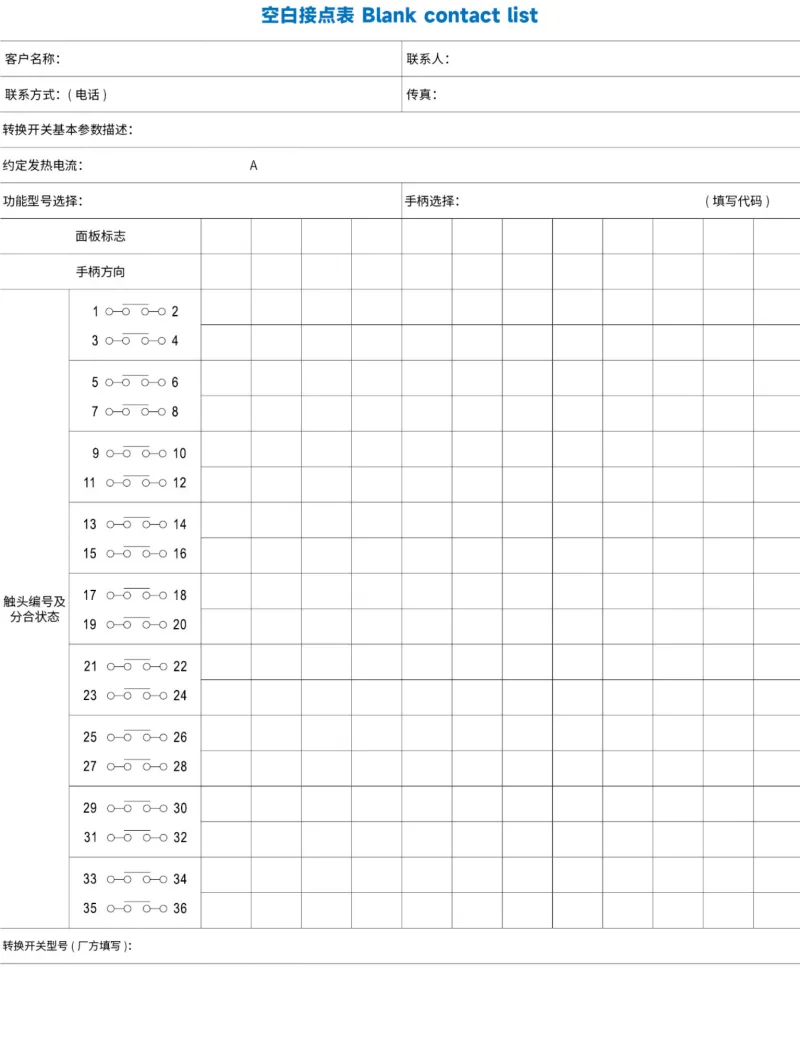
Specify thermal current, mechanical function, handle, panel wording, operating directions and the open/closed state of each terminal pair at each position. The worksheet provides nine sections, with pairs 1–2 through 35–36; the selected mechanism's section limit still applies.
The standard minimum applicable load is 24VDC, 10mA. Smaller signals require an appropriate small-load contact configuration. Contacts used on general loads should not subsequently be reused for smaller signals, because surface changes can reduce low-current reliability. Use suitable CR suppression and contact protection where bounce, noise or pulse currents affect the circuit.

These switches are intended for industrial controls. High-reliability infrastructure, safety-critical transport or medical systems, severe outdoor or contaminated environments, fire or explosion hazards, military uses and large engineering projects require a specifically designed and expressly confirmed configuration.
